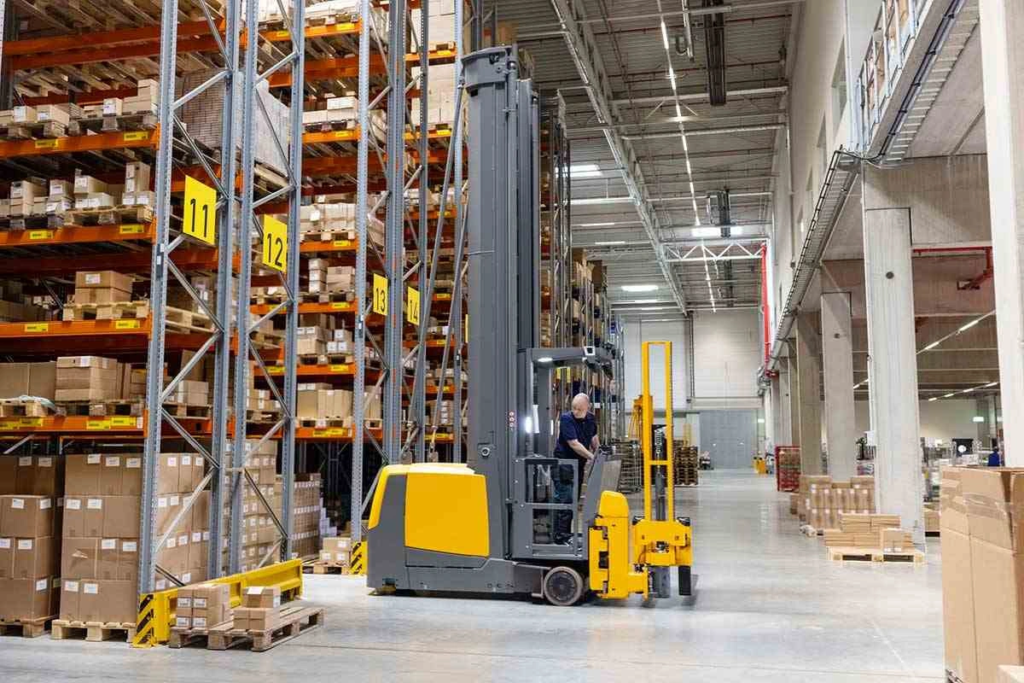
Warehouse pallet rack design plays a vital role in optimizing inventory management. A well-designed system typically lasts 10-20 years or more. The average warehouse height has jumped from 16 feet to 32-40 feet since the 1970s. These taller structures create new safety challenges that facility managers must address.
Warehouses with poorly planned rack layouts struggle with reduced productivity and limited inventory access. A complete pallet rack design needs to balance many factors. Structural integrity becomes crucial, especially in seismic zones where taller racks sway more. Industry professionals know that the best results come from early planning. The design must work with standard pallet sizes (40″ x 48″) that fit most systems. Modern movable racking systems offer a smart solution to optimize space. These systems can double storage capacity by removing unused aisle space.
This piece helps warehouse managers understand everything in creating safe and efficient pallet racking systems. The focus stays on balancing accessibility, capacity, and meeting regulations.
Load and Pallet Specifications in Rack Design
Accurate pallet specifications are the foundations of warehouse pallet rack design. Both operational efficiency and workplace safety depend on precise measurements and weight calculations throughout the facility’s life.
Standard Pallet Dimensions: 40″ x 48″
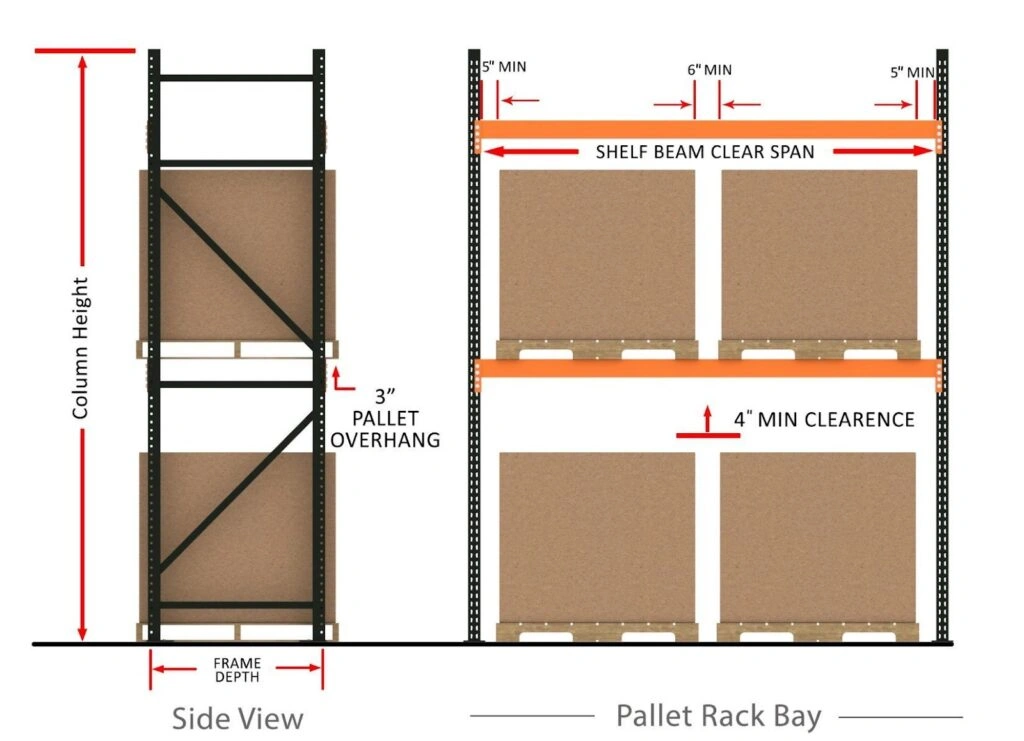
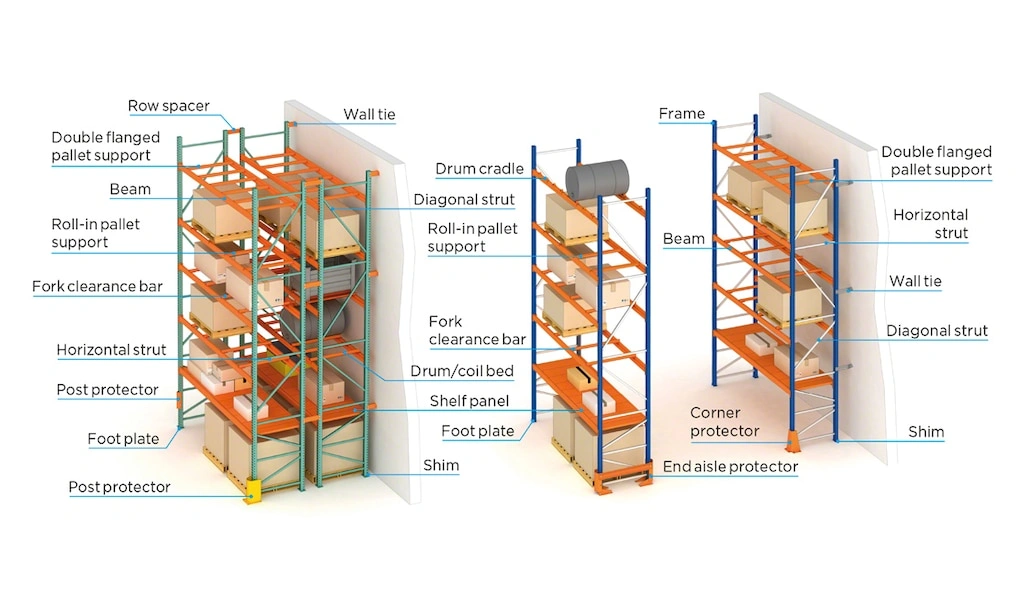
The Grocery Manufacturers Association (GMA) set North America’s most common pallet size at 40″ wide by 48″ deep about 40 years ago. This standard size helps warehouse rack designs follow consistent patterns. A 42″ upright frame depth works best with these standard pallets and leaves about 3″ of overhang on both front and back. The pallet’s weight should rest on the support beams rather than the wire decking, which isn’t built to handle the main load.
GMA standards say compliant pallets must handle at least 2,500 pounds when supported properly. Most racks employ 8′ beams that fit two standard pallets side by side with enough space between them. Warehouse managers need to leave at least 4″ of total space between pallets and 3″ between the pallet and upright frame during setup.
Weight Distribution and Load Capacity
Pallet racks handle weight in several ways, each needing specific design choices:
- Uniformly Distributed Load (UDL) – The best setup where the weight spreads evenly across the front and rear beams
- Point Load – Weight focuses on small feet or points, which reduces how much the beam can hold
- Line Load – Weight sits on single lines (you’ll see this with machine tools or material rolls)
- Concentrated Load – Small items that can’t reach both beams create uneven pressure
Load calculations must plan for the heaviest possible weights, not just averages. Designers should add extra safety margin above the highest predicted weight. Remember that beam capacities usually assume the load spreads evenly.
Irregular Load Shapes and Their Effect
Unusual merchandise creates special challenges for pallet racking systems. Uneven loads—like machines that weigh more on one side—change how much weight beams can hold, even when on pallets. Wire decking works well for flat-bottomed odd items, while drum cradles are perfect for round objects like wire spools.
Engineers need to know all load details before installation to build safe, stable systems. The key factors are weight per unit and bay, size, shape consistency, pallet type, and container details. Unusual product shapes need careful baseplate size and anchor bolt calculations to keep the system stable.
Inventory Flow and Retrieval Method (FIFO vs LIFO)
Warehouse pallet rack design’s safety and efficiency depend on how inventory flows through the system. The choice between First-In, First-Out (FIFO) and Last-In, First-Out (LIFO) methods affects product accessibility and determines the best racking structure that meets operational needs.
FIFO Requirements for Perishable Goods
First-In, First-Out inventory management puts products with the earliest expiration dates first in line to be used. The oldest stock stays at the front while newer items go behind. This creates a rotation system that cuts down waste and keeps products fresh. FIFO brings several benefits:
- Less waste from expired products
- Better food safety through proper rotation
- Meets regulatory standards (including HACCP requirements)
- Better control over stock and inventory tracking
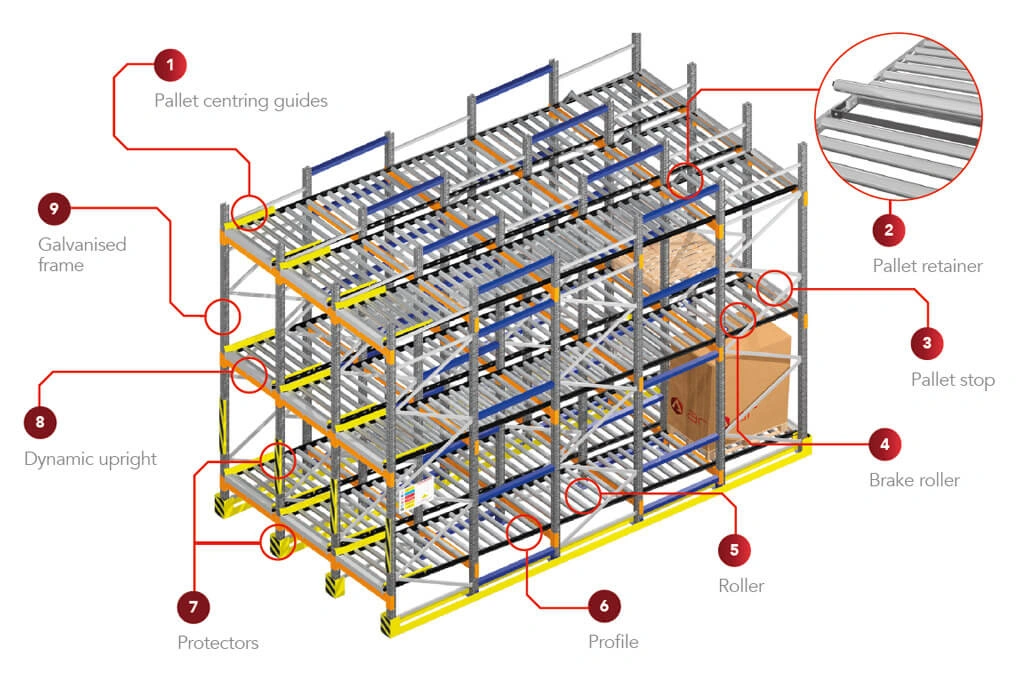
Warehouses handling perishable goods use pallet flow racking systems to support FIFO operations. These systems have slightly tilted roller beds that move pallets from the loading end to the unloading end. Workers can load from one side while others pick from the opposite end. This setup keeps the workflow smooth and safe.
LIFO Systems for Bulk Storage
LIFO systems work differently – they prioritize the newest stored merchandise. This makes them perfect for similar, non-perishable products that don’t expire. LIFO works best when:
- Products stay fresh for long periods (building materials, metals, industrial parts)
- You need to maximize space more than turnover speed
- Loading and unloading speed matters more than rotating stock
Push-back racking shows LIFO at its best. Forklift operators push existing loads back as they add new pallets [12]. Drive-in racking also supports LIFO by letting forklifts access stored goods through a single work aisle. This setup makes the most of available storage space.
Matching Flow Type to Rack System
The inventory management method you pick will determine your warehouse racking layout design. Your team should look at several things:
- Product type and how long it lasts (perishables need FIFO)
- How much storage density do you need (LIFO usually packs more in)
- How fast stock moves (quick-moving items work better with FIFO)
- The space you have (LIFO makes the most of tight spaces)
Selective pallet racking works with either method but needs strict rules to work well. Special systems like pallet flow racks (for FIFO) or push-back racks (for LIFO) handle inventory flow automatically. This keeps operations consistent even as staff changes or procedures drift.
The right match between inventory needs and racking systems creates a safer warehouse that runs more smoothly.
SKU Volume and Storage Density Considerations
The warehouse pallet rack design depends heavily on SKU quantity and volume. A well-planned racking setup strikes the right balance between storage density and accessibility based on inventory needs.
High SKU Count: Selective Racking
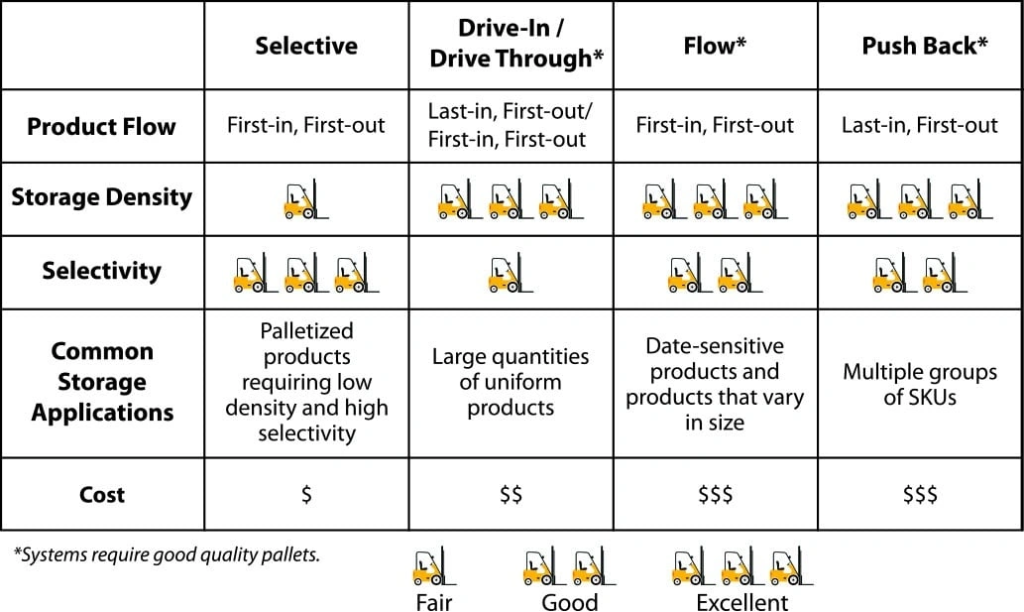
Selective pallet racking stands out as the best choice for warehouses that handle diverse product inventories. This system gives workers quick access to every pallet, making it perfect for facilities that store many different products or SKUs. The system scores a 1 on the selectivity scale (1-5) since workers can reach any pallet without moving others.
Selective racking is a great way to get these key benefits when you need frequent access to products:
- Direct access to 100% of stored pallets
- Excellent flexibility for operations with high SKU variety
- Support for both FIFO and LIFO inventory management
- Lowest upfront cost per pallet position compared to other systems
While selective racking needs more space for aisles, it remains the top choice for retail warehouses, distribution centers, and facilities that value quick picking over storage density.
Low SKU, High Volume: Drive-In or Push-Back
High-density systems work best for operations that store fewer SKUs in larger quantities. Drive-in racking scores 1-2 for storage density (on a 1-5 scale) and maximizes space by almost eliminating aisles. This system performs best with 10 or fewer high-volume SKUs.
Push-back racking provides a middle ground with a storage density rating of 2-3, usually fitting 2-6 pallets deep per lane. Each lane can hold different SKUs, and new pallets push existing ones back along inclined rails.
Balancing Accessibility and Density
A clear tradeoff exists between storage density and product accessibility:
- Selective: Low density (5/5) but highest selectivity (1/5)
- Pushback: Good density (2-3/5) with moderate selectivity (2-3/5)
- Drive-in: Highest density (1-2/5) but lowest selectivity (4-5/5)
Facilities should analyze their SKU profile—particularly the number of pallets per SKU—before choosing a racking system.
Warehouse Environment and Temperature Zones
Temperature plays a crucial role in warehouse pallet rack design decisions. Environmental conditions require specific materials and layouts to protect products in storage zones of all types.
Cold Storage Rack Design Constraints
Temperature-controlled warehouses need specialized racking solutions, especially when dealing with freezer environments at 0°F (-18°C) or below. Coolers that maintain temperatures between 33-41°F (1-5°C) require hot-dip galvanized rack components to prevent rapid corrosion from high humidity. Standard painted rack finishes will deteriorate within 3-5 years in these environments. A protective zinc coating from galvanizing protects the steel underneath from moisture damage. Drive-in or pushback rack designs work best for freezer storage applications to maximize expensive refrigerated space.
Ambient vs Controlled Temperature Layouts
Ambient warehouses run at room temperature (58-77°F/15-25°C) with minimal environmental control. Temperature-controlled facilities employ sophisticated systems like HVAC, industrial refrigeration, monitoring alarms, and data loggers to maintain exact conditions. Climate-controlled warehouses take this further by managing humidity and air quality along with temperature. These differences affect pallet racking system design through:
- Material selection (corrosion-resistant components for controlled environments)
- Storage density prioritization (maximizing space in expensive cooled areas)
- Rack configuration (accommodating air circulation requirements)
Compliance with FDA and Food Safety Standards
Food storage facilities must follow FDA regulations that require proper monitoring systems for temperature control. Good ventilation in pallet racking layouts stops bacteria growth, mold, and mildew from forming. FDA guidelines require non-corrosive storage systems like galvanized or stainless steel pallet racking in cooler and freezer areas. Food-grade warehouses must keep records that prove products stayed within specified temperature ranges during storage.
Material Handling Equipment Compatibility
The safety and efficiency of warehouse pallet rack design heavily depend on choosing the right material handling equipment. A well-matched combination of racking systems and forklifts determines both storage capacity and smooth operations.
Forklift Turning Radius and Aisle Width
Standard counterbalanced forklifts need aisles that are 12-13 feet wide to navigate safely. Narrow aisle pallet racking works with 8-10 foot widths and boosts storage capacity by about 25%. Specialized equipment with guidance systems – wire guidance, optical guidance, or guide rails – allows very narrow aisle setups that maximize density. Equipment size and maneuverability play a crucial role, and even narrow aisle setups need aisles at least 36 inches wider than the largest equipment.
Reach Trucks vs Turret Trucks for Tall Racks
Reach trucks can lift loads up to 14.2 meters (about 46.5 feet) high and handle weights up to 2 tons. These versatile machines need aisles at least 2.7 meters (8.9 feet) wide to operate. Turret trucks shine in very narrow aisles with their rotating masts that handle pallets at 180 degrees without turning the whole vehicle. They can reach impressive heights of 17 meters (55.7 feet). Swing-reach turret trucks can triple pallet capacity in existing warehouse spaces when space is severely limited.
Lift Height and Beam Level Planning
Rack beam elevation design depends on maximum lift height capabilities. Overhead operator cabin guards need proper clearance at first beam levels. The maximum storage heights are set by sprinkler heights minus required clearances – 18 inches for standard systems or 36 inches for ESFR systems.
Seismic and Structural Safety Requirements
Structural integrity is the life-blood of safe warehouse pallet rack design, and seismic considerations apply to all geographic regions. Facilities outside California experience about 50 earthquakes daily at different intensities. This reality demands complete safety planning.
Seismic Zone Classification and Rack Reinforcement
Modern seismic requirements have moved away from general “zones” and now use location-specific parameters. Yes, two warehouses in the same region might need different reinforcement standards. The Federal Emergency Management Agency (FEMA) created seismic guidelines back in 2005, which the Rack Manufacturers Institute (RMI) and the International Building Code later adopted. Rack designs in high-seismic areas use reinforced corner brackets and precision-drilled mounting points. These designs also feature welded steel construction to absorb building motion.
Baseplate Sizing and Anchor Bolts
Baseplates—rectangular metal plates at each upright frame’s foot—give stability and usually have two anchor holes. The surprising fact is that you should use just one hole to anchor, as using both could weaken the floor. Anchors in higher seismic zones (Seismic Design Category C or above) need an overstrength factor of 2. This is a big deal as it means that the tension force doubles. Thicker steel baseplates help improve shear resistance and protection from impactsOversized baseplates work better at distributing loads in areas with significant seismic activity.
Height-to-Depth Ratio Compliance (6:1 Rule)
The RMI’s critical height-to-depth ratio formula divides the distance from floor to top beam level by frame depth. ANSI MH16.1 specifications state that single-row racks with ratios above 6:1 need special measures to prevent overturning. To cite an instance, see a 240-inch rack with 42-inch depth that yields a 5.714 ratio (acceptable). However, a 24-foot rack with the same depth gives a 7:1 ratio, which needs reinforcement. You can stabilize racks by connecting back-to-back configurations with row spacers, adding more anchors with engineer-approved specifications, or installing cross-aisle or overhead ties.
Inspection, Maintenance, and Safety Accessories

Safety inspections and protective accessories are the foundations of detailed warehouse pallet rack design. These elements prevent damage that can get pricey and provide a reliable way to meet safety standards.
Third-Party Rack Inspections
Third-party inspections deliver unbiased evaluations of rack conditions and eliminate implicit biases that might affect internal assessments. Note that professional inspectors can spot intricate details like missing capacity tags that others might miss. Three inspection levels exist: Level 1 suits small operations ($1,000-$5,000), Level 2 offers more detailed assessments ($5,000-$8,000), and Level 3 provides complete certification with engineering approval. Industry standards suggest annual formal inspections with additional checks needed in high-activity areas.
Column Guards and End-of-Row Protection
Column protectors defend rack uprights from forklift collisions that could weaken structural integrity. These guards absorb energy from impacts and protect the frame while offering easy replacement if damaged. End-row guards, typically 12 inches tall with safety yellow paint, extend protection along horizontal struts. Both options offer substantial returns by eliminating downtime, unloading, replacement, and reinstallation costs that occur when uprights sustain damage
Load Plaques and Signage for Safety Compliance
Load plaques must show maximum unit loads, average unit loads, maximum bay loads, and stacking permissions. These most important safety components need prominent display at rack ends and updates whenever systems are rearranged. Proper signage satisfies International Building Code requirements and will provide a way to maintain OSHA compliance while preventing dangerous overloading situations.
Conclusion
A well-designed warehouse packing rack system needs to balance operations and safety through its lifecycle. Warehouse managers should think about several key factors before they set up any racking system. Standard GMA pallets (40″ x 48″) need specific clearances and weight distribution calculations, which makes load specifications crucial. The choice of inventory management system affects rack selection too. FIFO systems work best for perishable goods, while LIFO configurations help maximize storage space for similar products.
Your SKU profile determines storage density needs. High-SKU operations work better with selective racking, even though it offers less density. On the flip side, storing fewer products in bigger quantities works better with drive-in or push-back systems. The warehouse environment also plays a role in choosing materials. Temperature-controlled areas need special galvanized components to prevent rust damage.
The type of material handling equipment you use determines your aisle width and rack height limits. Standard forklifts need wider aisles. Specialized equipment like turret trucks lets you use narrow aisles, which increases your storage capacity by a lot. Safety is another big concern. You need proper baseplate sizing and the right height-to-depth ratios to prevent major failures, whatever your location.
Regular third-party inspections are essential after installation. You also need protective accessories like column guards and end-row protection. These features, along with clear load plaques, keep operations safe and protect your investment in warehouse racking.
Smart warehouse pallet rack design creates safe and efficient storage spaces that fit your specific needs while meeting all regulations. Companies that focus on these design factors keep their workers safe and improve their inventory management for years to come.
Key Takeaways
Understanding these critical design factors ensures your warehouse pallet rack system delivers maximum safety, efficiency, and ROI over its 10-20 year lifespan.
• Match rack type to inventory profile: High-SKU operations need selective racking for accessibility, while low-SKU/high-volume storage benefits from drive-in or push-back systems for density.
• Calculate precise load specifications: Standard 40″x48″ pallets require 42″ frame depth with 3″ overhang, and capacity must account for worst-case weight distribution, not averages.
• Align equipment with aisle requirements: Standard forklifts need 12-13′ aisles, while narrow-aisle systems with specialized equipment can increase storage capacity by 25%.
• Prioritize structural safety compliance: Follow the 6:1 height-to-depth ratio rule, use proper baseplate anchoring, and implement seismic reinforcement regardless of location.
• Invest in protective accessories and inspections: Column guards, end-row protection, and annual third-party inspections prevent costly damage and ensure ongoing OSHA compliance.
Proper warehouse pallet rack design isn’t just about maximizing storage—it’s about creating a system that protects workers, preserves inventory, and adapts to changing operational needs while meeting all regulatory requirements.
FAQs
Q1. What are the key factors to consider when designing a warehouse pallet racking system? The main factors include load specifications, inventory flow methods (FIFO vs LIFO), SKU volume, storage density requirements, warehouse environment, material handling equipment compatibility, seismic safety considerations, and ongoing inspection and maintenance needs.
Q2. How does the choice between FIFO and LIFO inventory management affect rack design? FIFO (First-In, First-Out) is ideal for perishable goods and requires systems like pallet flow racking. LIFO (Last-In, First-Out) is better for non-perishable bulk storage and works well with push-back or drive-in racking. The choice impacts rack configuration and accessibility.
Q3. What are the standard dimensions for pallet racking, and why are they important? Standard pallet dimensions are 40″ x 48″, with a 42″ upright frame depth providing optimal support. These standards ensure proper weight distribution, clearance, and compatibility across different racking systems and material handling equipment.
Q4. How do seismic considerations impact warehouse rack design? Seismic considerations affect baseplate sizing, anchor bolt requirements, and the need for reinforcement in high-risk areas. The 6:1 height-to-depth ratio rule is crucial for stability. Even in low-risk areas, some level of seismic design is recommended for safety.
Q5. What role do third-party inspections play in warehouse racking safety? Third-party inspections provide unbiased evaluations of rack conditions, helping detect issues that might be overlooked internally. They ensure ongoing compliance with safety standards, prevent costly damage, and are recommended annually, with more frequent checks in high-activity areas.